Showing posts with label Cell Phone Koozies. Show all posts

Saturday, January 5, 2013

As Promised Cell Phone Koozie How-To's

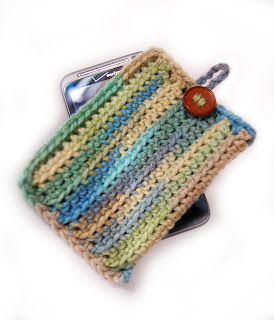
As I had mentioned in yesterday's FO Friday Post I didn't use a pattern for these koozies and went free form. I wrote down what I did so you can try your hand at it too. Each phone is different so each koozie size will be different, so free form may be the best way to go (IMO).

Cell Phone Koozie #1


Chain as tall as the phone is. SC FLO each chain, turn & repeat until the created fabric is long enough to cover both the front & back of the phone. SC around the open edge of the back side to 1/2 way (1/2 of one side of opening, 1/4 of entire length) chain up to make a loop that will grab the button which will be attached to the front. Continue to Sc in next stitch on opening and the rest of the way around the opening. Once at the end of the opening (front & back) fold fabric in half and SC through BOTH edges to create a seam. Do the same (SC through BOTH edges) along the bottom as well. FO. Attach a button at the top edge of the front side.

Cell Phone Koozie #2


Chain as tall as the phone is. SC BLO each chain, turn & repeat until the created fabric is long enough to cover both the front & back of the phone. SC around the open edge of the back side to 1/2 way (1/2 of one side of opening, 1/4 of entire length) chain up 10 - 15 chains then SL ST back down chain to edge, continue SC around to 1/2 way on the front side of the opening, chain up 10 - 15 chains then SL ST back down chain to edge, continue SC around to end of the opening. Once at the end of the opening (front & back) fold fabric in half and SC through BOTH edges to create a seam. Do the same (SC through BOTH edges) along the bottom as well. FO. 

Cell Phone Koozie #3


Chain as long as needed to go front to back around the phone (not bottom to top like the first two). Do complete rows w/ appropriate turns at the end of each one (ch 1 for beginning of sc row, ch 2 for beginning of hdc row, ch 2 for beginning of dc row, ch 3 for beginning of tr row) Use the following pattern for rows: 
Row 1 - sc
Row 2 - hdc
Row 3 - sc
Row 4 - dc
Row 5 - sc
Row 6 - tr
Row 7 - sc
Row 8 - dc
Row 9 - sc
Row 10 - hdc
Row 11 - sc
Row 12 - sc
Repeate from Row 1 until fabric is as tall as the phone is.
Fancy edging on the top of the opening: ch 3, skip next 2 sts, 1 dc into next st. *ch3, 4 dc into sp made by dc just worked, sk next 3 sts, 1 dc into next sc. Repeat from * to end. Fold fabric in half and seam together the sides & the bottom by sc through both edges. FO.

----------------------------------------------------------------------------

Did you notice a difference in the pictures? If not take a look at this:
Photo from yesterday's post

Photo from today's post

I used tips from this Blog Post by Stacey @ Fresh Stitches to make the photos cleaner. It's one of my resolutions/goals this year to not post crappy pictures. I thought the photos yesterday were pretty good but then I read Stacey's post and tried it out! What a difference!

--------------------------------------------------------------------

P.S. That last paragraph includes another one of my resolutions/goals for 2013 -- Link More!

Friday, January 4, 2013

FO Friday, 1.4.13

So apparently I have to train my fingers to type & write 2013...

Anywho, lots of FOs to show you this week, so I'd best get started!
So to start I have three cell phone cases I made for our bowling team mates.
Case #1


Case #2
Case #3

Pattern: None, free form made them, will post how either this evening or tomorrow morning
Yarn: Leftover variegated acrylic yarn, most likely Red Heart. (This was some of the first yarn I bought)

Next up was the Penguins. I finished the boy one last week but added the finishing touches and completed the girl this week.


Pattern: from Amigurumi World
Yarn: Red Heart Super Saver in Black & other leftover acrylic yarns (one of my goals for 2013 is keeping better track of my yarns)

Now for another FO, Denny the Giraffe:

Yarn: Red Heart Super Saver - Cornmeal & Bernat Supervalue - Rustic Heather

All of the previous FOs today are for people on our bowling league. Just show's how much bringing crochet to bowling gets people interested. The next two are for people at work, another place I bring my crochet for down time. First up is a Bunny (who was the first finished project of 2013):

Pattern: Woolly Jumpers
Yarn: Bernat Super Value - True Grey. Grey & White Tweed style acrylic yarn, possibly Red Heart.

And last but not least, a Zombie Kitty:


Spencer the Zombie Kitty is ready for his cameo on the Walking Dead
Pattern: Japanese Ameniko Pattern translated by Oh the Cuteness!
Yarn: Bernat Supervalue in Grass & Red Heart Super Saver in Tea Leaf.
I did a few things different on this Spencer, used a different color yarn (in the past have used the Tea Leaf as the main color & black for the paws) this time went all green. Also made a "bite mark" on his arm where I chained some and skipped the same number of SC's while going around. This allows for the stuffing to show through. Patched it up with a simple cross stitch in black. Also photographed him on my green screen background so that I could superimpose him into this photo from the Walking Dead. (Which is a super addictive show, even for a super scardie cat like me!)

Starting this week at the end of my posts on Fridays you will see an updated counter, it will show the total # of projects finished so far in 2013. 

As always, checking in with Tami's Amis for FO Friday! 


PS... look for something new this Sunday!